

 Fasteners & Materials
Minifix Cam Connectors: What They Are and How to Fit
A minifix cam connector is a hidden fitting that pulls two furniture panels together at a right angle and lets the furniture be taken apart again. This article goes step by step through its parts, how it differs from a screw, where the set with a plastic dowel is needed, how to mark out the holes and the order of assembly. At the end we count how many connectors a simple cabinet takes. Take the drilling sizes from the set in your hand, because they vary from one manufacturer to another.
What a minifix is: bolt, cam and dowel
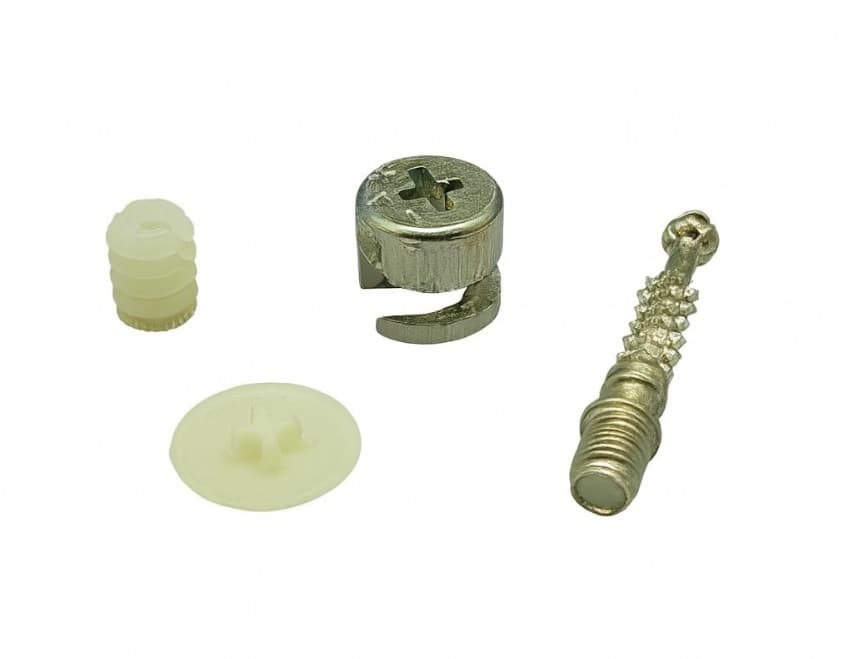
A minifix (cam connector, eccentric connector) has two parts. The first is the bolt: a thin metal pin with a thread at one end and a head at the other. It is screwed into the face of the first panel. The second is the cam: a round piece with a slot in its side that sits in a round pocket drilled in the face of the second panel. The bolt passes through a hole in the edge of the second panel and its head enters the slot in the cam.
When the cam is turned with a screwdriver, the spiral surface inside it catches the bolt head and draws it in, and the two panels are pulled tight. From outside only the face of the cam can be seen, and it usually ends up on the inside of the carcass. The minifix set with a plastic dowel has a third part: a dowel pressed into the board. The bolt screws into the dowel instead of the wood.
How it differs from a screw and where it is used
A screw goes through the panel from outside and its head stays on the face: it has to be covered with a cap or used where it will not be seen. With a minifix the outer face stays clean, because the whole fixing is inside the boards and on the inside of the carcass. The second difference is dismantling. In laminated chipboard a screw thread wears the hole a little every time the joint is taken apart; a minifix is released by turning the cam back and tolerates dismantling better than a screw. That is why it is the main fixing in furniture that is moved in parts and assembled on site: wardrobes, cabinets, shelving and desks.
It does not have to go everywhere, though. Where the fixing will not be seen, for example on a side that stands against a wall or on the top of a tall cabinet, a screw is quicker and cheaper: one hole instead of three. Which length goes where is covered in our article on furniture screw sizes.
Sets with and without a plastic dowel: the difference
The minifix set without a dowel is a bolt and a cam: the bolt screws straight into the hole in the panel face and its thread holds in the board itself. In dense MDF, and in furniture that is assembled once and left in place, that is enough.
In the set with a plastic dowel, the dowel is pressed into the board first and the bolt is screwed into it. As the bolt goes in, the dowel expands in the hole and grips the walls. The benefit shows most in laminated chipboard: the core of chipboard is loose and a thread crumbles it quickly, especially when the furniture is taken apart several times. The dowel takes that load, so the board itself is not worn when the bolt is removed and screwed in again.
Both sets are listed in the catalogue with the variant '8 mm'. Before buying, ask the shop which dimension that figure refers to, how long the bolt is and what board thickness the set is made for.
Marking out and drilling
Each minifix needs three holes. The first is in the face of the first panel, for the bolt or the dowel. The second is drilled into the edge of the second panel, exactly in the middle of its thickness, and the bolt passes through it. The third is the round cam pocket in the face of that same panel; the edge hole must come out right in its centre.
For the widespread 15 mm cam the pocket is usually 15 mm in diameter and about 12.5–13.5 mm deep in 16–18 mm board, centred 34 mm from the panel edge, with an 8 mm hole through the edge. These are general figures and may not suit every set: take the sizes from the set in your hand and measure the bolt and the cam with calipers.
Drill the pocket with a Forstner bit and a depth stop so that you do not break through the other face. Before drilling all the parts, make a test joint on two offcuts.
Order of assembly
First screw the bolt into the first panel. With the dowel set, press the dowel into its hole and then screw the bolt into it. Drive the bolt until it stops, but do not force it: it must stand square to the panel face, and all the bolts must project by the same amount.
Then fit the second panel over the bolts: they must pass through the edge holes and come out in the cam pockets. The panels must close up tight with no gap. Drop the cam into its pocket with the slot facing the bolt (it is usually marked with an arrow); otherwise the head will not go in.
Now turn the cam clockwise with a cross-head screwdriver. It turns easily at first, then catches the bolt and pulls the joint tight; stop as soon as you feel it seat firmly. If you use a cordless driver, set the lowest torque and do the final tightening by hand. Tighten the cams of one joint in turn, one after another.
Common mistakes
The most common mistake is the depth of the pocket. If the pocket is too shallow, the cam stands proud of the face and does not line up with the axis of the bolt; if it is too deep, the cam drops, fails to catch the head, and the thin layer left under it can break out. The second mistake is a bolt hole that is off its mark: even one millimetre out and the panels meet with a step, which cannot be corrected after assembly.
The third is over-tightening. The cam is usually a cast alloy: with too much force it cracks, or the laminate bulges beside the pocket. If the joint will not pull up, look for the cause in the hole sizes, not in the force.
Relying on minifix alone on a long joint is also a mistake. It pulls the panels together but does little to stop them sliding sideways. That is why wooden dowels are fitted between the connectors: the dowel locates the parts and the minifix clamps them.
How many minifix connectors a cabinet needs
The count starts with the number of joints: every place where two panels meet at a right angle is one joint. At normal depths two connectors go into each joint, one near the front edge and one near the back. In a wardrobe about 60 cm deep many fitters add a third in the middle, or put a wooden dowel between the two.
An example: a simple cabinet made of two sides, a top, a bottom and one fixed shelf. The top and the bottom each give one joint with each side, which makes four; the fixed shelf adds two more. Six joints with two connectors each come to 12 bolts and 12 cams. Ask how many pieces are in a set when you buy.
The rest is counted separately: a back panel connector for the back panel, four shelf supports for each loose shelf, and a shelf support with a suction cup if the shelf is glass. Hanging rails and the other parts are covered in wardrobe interior fittings, and all the fixings are in the catalogue.
For an overview of every type, see the furniture hardware guide.
Want to place an order?
You can easily place your orders via WhatsApp.